Operation I-Go: April 12, 1943
Last major Japanese air raid over Port Moresby
by Justin Taylan
"Operation I-Go" was planned by Imperial Japanese Navy (IJN) Admiral Isoroku Yamamoto to eliminate Allied air power in New Guinea and the Solomons. Yamamoto committed the full weight of Imperial Japanese Navy (IJN) carrier-based
aircraft flying from airfields around Rabaul in a
series of major strikes against enemy air forces and shipping in the Solomon Islands and New Guinea.
Since January 28, 1942, the Port
Moresby area was subjected to hundreds of Japanese air raids. During early April 1943, there was a relative lull in air raids.
On April 3, 1943 to oversee the operation, Admiral Isoroku Yamamoto and his staff flew from Truk to Rabaul to oversee Operation I-Go. scheduled to commence on April 7, 1943 with the first mission a strike against Tulagi that resulted in several ships being sunk.
On April 7, 1943 the first phase X Attack began with an air strike against Allied ships in Tulagi Harbor.
On April 11, 1943 the second phase targeted Allied ships in Oro Bay.
On April 12, 1943 the third phase targeted Port Moresby. A total of 44 G4M1 Bettys took off from Vunakanau Airfield near Rabaul. The formation included 17 Bettys from 751 Kōkūtai (751 Air Group) led by Masaichi Suzuki (C. O. 751 Kōkūtai) plus 27 from 705 Kōkūtai (705 Air Group) led
by Lt. Commander Tomo Nakamura. Escorting were 131 A6M Zeros from 253 Kōkūtai (253 Air Group) plus land based carrier aircraft including 23 Zeros from Zuikaku and 14 Zeros from Zuihō. The formation of 175 aircraft, the largest force to ever strike Port Moresby climbed to high altitude in tight "V"
formations.
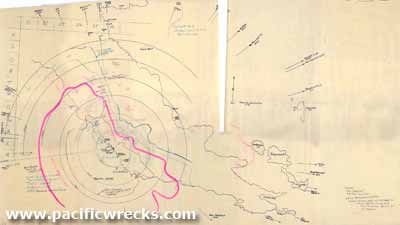
As the Japanese formation crossed the Owen Stanley Range, they were tracked by radar atop Paga Hill. Australian Army anti-aircraft guns including 3.7" heavy anti-aircraft batteries and medium anti-aircraft fired a total of 1,112 rounds at the attackers but failed to claim any hits. American fighters were scrambled to intercept the formation including P-38 Lightnings from 39th Fighter Squadron (39th FS) plus Airacobras from the 41st
Fighter Squadron (41st FS) and 80th Fighter Squadron (80th FS).
On the ground, Allied personnel observed the massive Japanese "V" formation and dozens of dog fights unfold in the skies above Port Moresby. Over the target, the Betty bombers targeted five airfields around Port Moresby, dropping their bombs between 10:15am to 10:25am
from 25,000'. The Zeros remained with the bombers.
At 5 Mile Drome (Wards) nine Japanese bombs destroyed and damaged parked aircraft. Specifically, the Royal Australian Air Force (RAAF) 30 Squadron lost Beaufighter A19-50 was destroyed by a direct bomb hit. Beaufighter A19-11 was damaged by a bomb that bounced off wing, and was used for parts afterwards. Beaufighter A19-37 was damaged and converted to parts. Beaufighter A19-5 damaged, repaired. The USAAF suffered two C-47s of the 6th TCS and three C-47s of the 22nd Troop Carrier Squadron were damaged by the bombing. The American aircraft were repaired, three the same day, one a week later and one two weeks later.
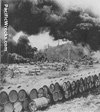
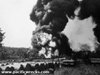
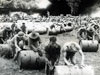
At 3 Mile Drome (Kila Kila), one chutai of
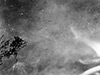
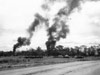
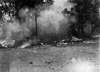
G4M1 Bettys from 705 Kōkūtai split off from the main formation to release their bombs over the airfield. Their bombs hit a fuel dump setting it on fire and causing a massive fire that blazed spectacularly. Several photographers captured a a large column of black smoke rising from the dump. Australian Army troops stationed nearby worked by hand to roll barrels of fuel away to minimize the damage. In total, 125,000 gallons of fuel went up in smoke and flames. The 3rd Bomb Group (3rd BG) headquarters, camped in the hills near the airfield sustained lots of shrapnel damage to tents.
At 12 Mile Drome (Berry) one P-39 Airacobra was badly damaged and an engineer camp area was was severely damaged.
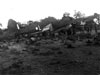
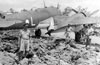
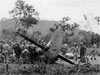
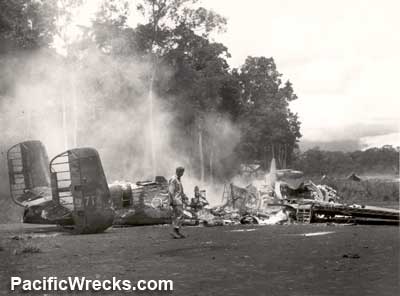
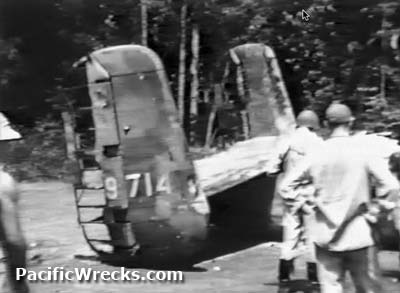
At 14 Mile Drome (Schwimmer) bombs hit two RAAF camp areas including No. 1 Rescue and Communications and 33 Squadron, both sustained moderate damage to living areas. Also, a DH-84 from 33 Squadron was slightly damaged. Destroyed on the ground were three B-25 Mitchells from the 3rd Bomb Group including B-25D "Fair Dinkum" 41-29714, B-25D "Baby Blitz" 41-29705 and B-25D "The Grim Reaper" 41-29719. Fourteen other Allied aircraft sustained various levels of damage.
Jack Heyn from the 3rd Bombardment Group was on the ground at 14 Mile Drome (Schwimmer) recalls:
"In January 1943 we moved to Port Moresby on New Guinea. April 12, 1943 was another day to remember for the 3rd Bomb Group. Here we experienced some night raids, and finally discovered why we had been digging those 'slit trenches' every time we made a move. Then came April 12 and our first daylight air raid. About 10:30am in the morning Marvin and I were working in the dark room when the 'Red Alert' sounded.
We grabbed our cameras and ran to the top of a hill adjacent to our camp site and from there we could see 14 Mile Drome runway where the 13th Bomb Squadron eight B-25s were parked. When we got to the top we heard the planes, looked up and saw the largest formation of planes we had ever seen, approximately 174 planes headed right for our hill. When we spotted the Jap formation I grabbed that shot, then we headed back down looking for a slit trench. We got about half way down and bombs started exploding and we just hit the dirt. When they quit we got a jeep and headed out to the field.
We decided we’d be better off in a slit trench and headed down the hill. About half way down bombs started exploding and we just hit the dirt. When they quit exploding we went on down, grabbed a jeep and headed out to the field. One group of planes had veered off and hit 14 Mile Drome, causing two plumes of smoke rising. When we got out we found that B-25D "Fair Dinkum" and B-25D "Baby Blitz" had taken direct hits. Five others had suffered major damage, and the 13th would sit idle for a few weeks until they received the new modified low level attack models.
Another group of the formation continued on down to hit 3 Mile Drome where the 8th and 89th Bomb Squadron were. On a hill overlooking the Airfield, headquarters squadron was camped, and beside them was a gasoline dump. The Japs laid a string of bombs thru the gas dump and the camp area. My good friend, Tack had been on duty that night and was asleep in his tent. When the Red Alert sounded he ignored it. When the bombs started exploding he just rolled out of his cot and laid there. When it was all over his tent was full of shrapnel holes, but it just wasn't Jack’s day to die."
Japanese Losses
The 751 Kokutai leading the bomber formation bore the brunt of the interception suffering a total of six G4M1 Betty bombers shot down by fighters including G4M1 Betty 1605 crashed into Mount Albert Edward. Returning from the mission, one G4M1 Betty crash landed at Lae Airfield. Eleven G4M1 Bettys from the 705 Kokutai sustained damaged, including some crew fatalities.
The escorting Zeros maintained a close escort with the bombers and engaged the intercepting enemy fighters. Despite the furious dog fights and American claims, no Zeros were lost during the mission. None of the Zeros dove down to strafe ground targets, wary of Allied machine gun and anti-aircraft defenses around the airfields and on nearly every hilltop in the Port Moresby area.
American Losses
American losses were: P-38G
42-12857 force landed at 30 Mile Drome (Rogers): and another P-38 pilot Alger force landed at 7-Mile Drome (Jackson). Four Airacobras were lost but each pilot bailed out and returned to duty. Lost were P-39D 41-38351 pilot 1st Lt. Richard Culton, P-39D 41-38402 pilot 2nd Lt Richard D. Kimball, P-39 pilot Keating and P-39 pilot Ferguson.
P-39D 41-38351 pilot 1st Lt. Richard Culton engaged
an A6M2 Zero which he later claimed, when another Zero opened fire from his six o'clock.
Pieces of 20mm shrapnel exploded off the engine block of his Allison engine
and lodged in Culton's neck. He bailed out and landed near Haima village
where he was given a cup of tea, before being returned to his squadron later
that afternoon in a U.S. jeep which pulled into the village looking for him.
His fighter had meanwhile crashed about two kilometers NW of the Village.
P-39D 41-38402 pilot 2nd Lt Richard D. Kimball bailed out to the north
and did not return to his base until eight days later. As Kimball
would later recount, his parachute became tangled in a tree, and
there he remained until natives climbed up and cut him loose. For
eight days he followed locals back to Moresby, following ridge lines
wherever possible. The wreckage of Kimball's fighter lies in deep
jungle beyond Sogeri.
Aftermath
The April 12, 1943 air raid against Port
Moresby failed to neutralize Allied air power in the area. Despite the large number of aircraft involved on both sides, aerial losses were fairly light.
For the Japanese, the April 12, 1943 marked the largest, and last Japanese daylight air raid over Port Moresby. Afterwards, air raids against Port Moresby would continue, but were limited to night missions by small groups or individual bombers conducting nuisance attacks. Despite Japanese claims, their bombs did destroy and damage many aircraft and failed to inflict tremendous damage to the airfields or aircraft available for operations.
For the Allies, there was no doubt that their air power and defenses at Port Moresby made the location too difficult of a target for the Japanese. Without a doubt, the Allied offensive had gained unstoppable momentum that would eventually defeat the Japanese in New Guinea and leave Rabaul an isolated.
On April 14, 1943 two strikes were conducted against shipping and airfields at Milne Bay. Lost were two A6M Zeros from 253 Kōkūtai, both shot down by defending fighters. On April 16, 1943 the last phase of the operation was canceled due to bad weather.
References
Japanese Monograph No. 122
Kodochosho, 751 Kōkūtai, April 12, 1943
Kodochosho, 705 Kōkūtai, April 12, 1943
Kodochosho, 253 Kōkūtai, April 12, 1943
Kodochosho, Zuikaku Kōkūtai, April 12, 1943
Kodochosho, Zuihō Kōkūtai, April 12, 1943"
Allied Air Transport Operations SWPA In WWII Vol 2, pages 52, 57
Japanese Naval Aces and Fighter Units of WWII (1989) page 428
Thanks to Minoru Kamada, Osamu Tagaya, Edward Rogers, Richard Dunn and Michael Claringbould for additional information
Contribute
Information
Do you have photos or additional information to add?
|