|
|
|
| Missing In Action (MIA) | Prisoners Of War (POW) | Unexploded Ordnance (UXO) |
| Chronology | Locations | Aircraft | Ships | Submit Info | How You Can Help | Donate |
|
| IJN 705 Kōkūtai 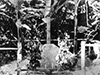 IJN 1944  Scott 1970s  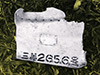 Rust In Peace 1975  Encyclopedia Japonica Encyclopedia Japonica1980 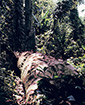   Pacific War Images 1984  Phil Bradley 1997 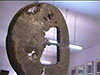 Justin Taylan 2000 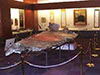 Yamamoto Museum 2001 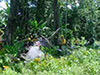   Jessie Owens 2002 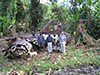 Bougainville Tours 2015 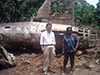 New Dawn FM 2015  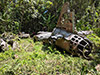 J. Taylan April 18, 2018 |
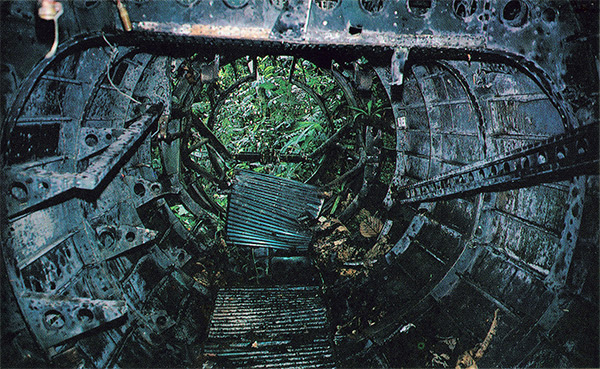
Pilot Flight Warrant Officer Takeo Kotani (KIA, BR) Co-Pilot Chief Flight Seaman Akiharu Ozaki (KIA, BR) Engineer Flight Petty Officer Haruo Ueda (KIA, BR) Front Gunner / Observer Flight Petty Officer Minoru Tanaka (KIA, BR) Radio Flight Petty Officer Nobuo Hara (KIA, BR) Assistant Radio / Top gunner Chief Flight Seaman Mitsuo Ueno (KIA, BR) Tail Gunner Chief Flight Seaman Harumasa Kobayashi (KIA, BR) Passenger Admiral Isoroku Yamamoto, Commander in Chief Combined Fleet (KIA, BR) Passenger Rear Admiral Rokurō Takata, Chief Surgeon Combined Fleet (KIA, BR) Passenger Commander Kurio Toibana, Air Staff Officer, Combined Fleet (KIA, BR) Passenger Commander Noburu Fukusaki, Yamamoto's Aide (KIA, BR) Crashed April 18, 1943 at 8:00am Aircraft History Built by Mitsubishi No. 3 Works at Nagoya during March 1943. At the factory, painted with standard green upper surfaces and gray lower surfaces. The upper nose and each upper engine cowling was planted black. The leading edge of the inner wings had a yellow identification stripe. The fuselage Hinomaru was outlined with a white square. Delivered to the Imperial Japanese Navy (IJN) as Type 1 Attack Bomber / G4M1 Model 11 Betty manufacture number 2656. Wartime History During March 1943 or early April 1943 flown from Japan south to Truk then to Vunakanau Airfield near Rabaul. Assigned to the 705 Kōkūtai (705 Air Group) with tail code T1-323, later changed to 323 in white on both sides of the tail. "Yamamoto Mission" After the conclusion of I-Go sakusen (Operation I-Go), Admiral Isoroku Yamamoto, Commander in Chief of the Combined Japanese Fleet and his senior staff planned an inspection tour of forward airfields and bases in the Shortlands and southern Bougainville. The purpose of this visit was to thank the Imperial Japanese Army (IJA) for cooperation during recent operations and boost moral after recent Japanese military defeats and setbacks. On April 13, 1943 a coded Japanese message NTF131755 was sent to the commanders of Base Unit No. 1, 11th Air Flotilla and the 26th Air Flotilla with the planned itinerary and timetable. This message was encoded using the Japanese Naval Cipher JN-25D and was intercepted and decoded by U.S. Navy cryptographers. Decoded, the message outlined Yamamoto's itinerary and timetable. According to the intercept, Yamamoto would depart "RR" Rabaul at 0600 in a medium attack plane [G4M1 Betty] and land at "RXZ" Ballale Airfield at 0800. Then, proceed by subchaser to "RXE" Shortland at 0840, then depart at 0945 aboard the same subchaser and return to Ballale at 1030, then depart at 1100 aboard G4M1 Betty and arrive at Buin Airfield (Kahili) at 1110. Finally at 1400 depart "RXP" Buin Airfield (Kahili) by G4M1 Betty and arrive back at Rabaul at 1540. All the times were in the Tokyo time zone used by the Imperial Japanese Navy (IJN). Local time was +1 hour ahead at Rabaul and +2 hours in the north Solomons. On April 17, 1943 a secret plan dubbed "Operation Vengeance" was formulated and approved by Admiral Chester W. Nimitz. The interception mission was assigned to U.S. Army Air Force (USAAF) P-38G Lightnings from the 13th Air Force (13th AF), 339th Fighter Squadron (339th FS) and 70th Fighter Squadron (70th FS) that would require them to fly 435 miles over the open sea to intercept the bombers and kill Yamamoto and his senior staff before they landed, assuming they followed the intercepted itinerary and timetable. The mission would be the longest mission flown by land based fighters up to this point in World War II. Mission History On April 18, 1943 before dawn took off from Vunakanau Airfield near Rabaul piloted by Flight Warrant Officer Takeo Kotani with co-pilot Chief Flight Seaman Akiharu Ozaki with G4M1 Betty Tail 326. Both bombers flew eastward then landed at Lakunai Airfield to pick up the senior staff passengers. Five passengers boarded this aircraft including Vice-Admiral Matome Ugaki, Captain Motoharu Kitamura, Rinji Tomoro, Kaoru Imananka and Suteji Muroi plus their baggage. On the ground at Lakunai Airfield, four passengers boarded this aircraft including: Admiral Isoroku Yamamoto, Rear Admiral Rokurō Takata, Commander Kurio Toibana and Commander Noburu Fukusaki plus their baggage. Meanwhile, five passengers boarded G4M1 Betty Tail 326 including: Vice-Admiral Matome Ugaki, Captain Motoharu Kitamura, Rinji Tomoro, Kaoru Imananka and Suteji Muroi. At 7:10am local time (6:10am Tokyo time) both bombers took off from Lakunai Airfield escorted by six A6M Zeros from 204 Kōkūtai (204 Air Group) and departing on schedule and flew to the southeast bound for Ballale Airfield where they were scheduled to land at 9:45am (7:45am Tokyo time). The weather was described as fine with intermittent cumulus clouds. During the flight, Admiral Isoroku Yamamoto sat in commander's seat behind and to the right of the two pilots as the highest ranking officer aboard. The gunners had their weapons stowed and possibly the tail 20mm cannon was removed before take off to accommodate the extra baggage. Meanwhile, P-38 Lightnings from the 339th Fighter Squadron (339th FS) led by Major John W. Mitchell took off from Fighter 2 (Kukum) on Guadalcanal as part of "Operation Peacock" (Yamamoto Mission) to intercept and shoot down the bombers. For the flight, each P-38 was equipped with two auxiliary drop tanks. South of of Empress Augusta Bay on Bougainville, the P-38 pilots spotted the Japanese formation and the P-38s split up to engage the escorting A6M2 Zeros while the attack group engaged the bombers. Roughly a mile away, the P-38s were spotted by the Japanese Yamamoto's Betty dove to low altitude as a defensive maneuver and was followed by the other Betty. Over southern Bougainville, Yamamoto's bomber was attacked from the rear by P-38G "Miss Virginia" 43-2204 #147 pilot 1st Lt. Rex T. Barber and crashed into the jungle of southern Bougainville. During the interception, both P-38G "Miss Virginia" 43-2204 #147 pilot 1st Lt. Rex T. Barber and P-38G 43-2238 #122 pilot Captain Thomas G. Lanphier, Jr. both made aerial victory claims for the shoot down of this Betty. Postwar research has definitively proven Lanphier's victory claim was incorrect and this bomber was shoot down solely by Barber. The second bomber G4M1 Betty Tail 326 was attacked from the rear by three fighters: P-38G 42-12690 #100 pilot 1st Lt Besby T. Holmes, P-38G pilot Hine and P-38G "Miss Virginia" 43-2204 #147 piloted by 1st Lt. Rex T. Barber and was shot down and ditched into the sea off Moila Point. Credit for shooting down Yamamoto's Betty After the mission, Lanphier landed first and immediately claimed to have solely shot down Yamamoto's bomber. He was officially credited with the victory, before a post mission briefing was conducted or other pilots interviewed. Officially, the U.S. Air Force (USAF) credited Lanphier with 1 1/2 victories. Barber with 2 1/2 victories. Holmes with 1 1/2 victories. In fact, only the two bombers were shot down and no escorting Zeros were lost. Postwar research has definitively proven Lanphier's victory claim is incorrect and this bomber was shoot down solely by Rex Barber. During the war, the news of the shoot down was suppressed in the United States, so as not to reveal that Japanese codes had been broken. Postwar research confirmed that Rex Barber actually shot down Yamamoto alone. This long standing controversy spawned a series of inquiries by several USAF credit review boards and the "Second Yamamoto Mission Association (SYMA)" to study the mission. But, officially, the USAF never changed the victory credit. Yet, Rex Barber is understood to be the sole pilot who shot down Yamamoto's Betty. This position was supported by the Second Yamamoto Mission Association, observations of the sole surviving Zero pilot, and even a letter Lanphier wrote to General Condon (claiming he shot down a bomber over the sea) and evidence from the bomber wreckage. Search Immediately after the crash, a group of Imperial Japanese Army (IJA) soldiers led by Lt. Tsuyoshi Hamasuna at Aku observed smoke rising from the jungle. At first, they believed an American aircraft had crashed nearby. Immediately, Lt. Hamasuna led a group of twelve of his soldiers into the jungle to search for the downed aircraft and spent the night in the jungle searching. On April 19, 1943 the Japanese Army patrol led by Lt. Hamasuna first reached the crash site. Initially, they were unable to identify the aircraft and found no survivors alive. The bodies inside the wreckage were burned and partially cremated by the fire. Other bodies were outside the aircraft wreckage. Quickly they realized the crashed plane was a Japanese Navy Type 1 Bomber (Betty) with passengers including Admiral Isoroku Yamamoto. Recovery of Remains Next, a Japanese Navy patrol was sent to the crash site to recover the remains of Admiral Yamamoto and the crew. Many English published accounts and references claim Yamamoto died in his seat, from a bullet wound to his chest. This is an imagined myth about how the Admiral died and is not supported by firsthand Japanese accounts. The Japanese eyewitnesses to Yamamoto's body reported few visible wounds and resulted in speculation he might have survived the initial crash and died hours later from internal injuries. Yamamoto's remains were transported from the crash site to the coast to the mouth of the Wamai River on the southern coast of Bougainville. His remains were placed aboard Minesweeper W-15 and an initial autopsy was conducted. Afterwards, the remains of the crew were transported to Buin (Kangua) then to the 1st Base Command at Buin. On April 20, 1943 a full autopsy was preformed on Yamamoto's body by LtCdr Tabuchi Jisaburo, Chief Medical Officer. On April 21, 1943 Yamamoto's body was dressed in his uniform and placed into a cremation pit, doused with petrol and cremated by Commander Watanabe. The remains of the rest of crew and passengers were cremated in two nearby pits. After his cremation, some of Yamamoto's remains were buried at an unmarked grave at Buin. On April 22, 1943 the remainder of Yamamoto's remains were transported to Buin Airfield (Kahili) and loaded aboard another G4M1 Betty and flown back to Lakunai Airfield and were placed overnight at the Third Fleet headquarters. On April 23, 1943 his ashes were loaded aboard two G4M1 Betty bombers that took off from Lakunai Airfield northward to Eten Airfield (Takeshima) landing at 1:45pm. Next, placed aboard Battleship Musashi in Truk Lagoon and transported to Tokyo arriving May 3, 1943. In Japan, news of Yamamoto's death was officially reported to the Japanese press as "having died in combat aboard an aircraft". On June 5, 1943 Yamamoto received a state funeral in Tokyo and his ashes were buried at Tama Cemetery with a portion given to his wife and buried at his family shrine in Nagaoka. Memorials During the war, at the Betty bomber crash site the Japanese built a shrine at the crash site. At the Yamamoto cremation site at Buin, two papayas were planted and a stone with his name caved into it atop. In the 1960s, a Japanese delegation visited the crash site and placed a memorial plaque on the admiral's seat that read "Last place of Admiral Yamamoto". In the early 1970s, when the commander's seat was removed, the plaque was left at the crash site. The plaque was last documented in 2002 and was missing since 2004. Since the Pacific War, Japanese visitors often leave small wooden prayer sticks or offerings at the crash site. Wreckage The crash site is located in a jungle covered area of southern Bougainville inland from Moila Point. As the bomber impacted trees, it was torn into pieces before it hit the ground and burned. During the crash, both wings and engines broke off and the nose and center section were destroyed by fire. The tail section broke off and landed relatively intact with both horizontal stabilizers broken off. On April 19, 1943 the Japanese found the crash site and recovered the remains of the crew and passengers. Later, the Japanese established a monument to honor Admiral Yamamoto and those that died in the crash. Postwar and during the colonial era, visitors to the crash site removed pieces of wreckage and smaller souvenirs. All of the bomber's armaments and instruments were removed by prior visitors. The number "323" was cut from the tail, whereabouts today are unknown. In the late 1960s, the Royal Australian Air Force (RAAF) 183rd Reconnaissance Flight, Pacific Island Regiment, based at Lae removed many smaller items including both of the control yokes (one cut at the upper stick with one rubber hand grip the other cut at the lower stick), and stenciled manufacture number 2656. Photographs of these items appear in Rust In Peace by Bruce Adams. Sometime in the early 1970s, the fuselage door, outer wing panel and commander's seat where Yamamoto sat during the flight. The upper portion of the seat has a hole from damage, consistent with the fatal back wound to Yamamoto's back reported in Yamamoto Autopsy (1971). Today, The crash site is located a few kilometers off the Panguna-Buin road near Aku. A pathway is maintained to allow visitors to access the site and requires an hour walk from the main road. Richard Rudd recalls visiting the site in October 1968: "While on an aerial mapping project, based out of Buin in October 1968 and the 'kiaps' at the time, (Australians), whilst imbibing and in conversation at the Buin Club, mentioned that a couple of weeks prior to our arrival, they had escorted a group of Japanese, complete with maps and WWII drawings to try and relocate the crash site. Which they did. We asked if it would be possible to be guided there again and when their time permitted, we drove up the coast/ inland track, getting permissions from various villages, until we quit the road and hiked off into the jungle for an hour or so. First sight was a wing with Hinomaru leaning against a forest tree, a flap? and then the bulk of the rear fuselage and engines. Much forward was all crushed and burnt and the Admirals seat by the rear door. In the jungle quiet, it was a sad scene to contemplate. Author Terry Gynne-Jones did a comprehensive article, with excellent color pictures in GEO magazine in the late 1970s." In 1972 and 1988, Charles Darby conducted a "forensic analysis" at the crash site on two occasions. His first visit was during 1972 and he returned to conduct a more thorough investigation in August 1988 for the "Second Yamamoto Mission Association (SYMA)" a group of researchers attempting to study the the shoot down. His research findings included photographic documentation and that all shrapnel and bullet holes on the wreckage were caused by bullets traveling forward, indicating the bomber was attacked fro the rear as described by Rex Barber. Photographs from his visit appear in his book Pacific Aircraft Wrecks... And Where To Find Them. Also, he provided evidence to the U.S. Air Force (USAF) as part of the Air Force Board for Correction of Military Records testimony of Dr. Charles Darby, October 17-18, 1991 (AFBMR Docket: 91-02347). His conclusion was "There was no evidence on any remaining wreckage of an attack from the bomber's starboard beam as related in all of Lanphier's accounts." During the "Bougainville Crisis" between 1988-1998, the crash site was not visited by outsiders but survived the conflict. In September 1999, Peace Monitoring Group (PMG) member Josh Mcdade visited the crash site and was given a notice from the Yamamoto Crash Site Landowner Association welcoming visitors and establishing an access fee of 10 Kina, in 2002, increased to 25 Kina. To the present day, visitors occasionally trek to the crash site in accordance with the landowners rules and fees. The local community closely guards the site to prevent the removal of any souvenirs by visitors. Between 2010–2015, the site was closed to visitors due to a land owner dispute between two clans. In May 2015, the crash site officially re-opened for visitors with a visit by Japanese ambassador to Papua New Guinea Hiroharu Iwasaki with the Deputy Director of National Planning. On April 18, 2018 Pacific Wrecks visited the crash site to perform a site survey and conduct a 75th anniversary memorial service attended by members of the local community plus visitors from Japan and the United States. Displays Since the early 1970s, pieces of wreckage and artifacts have been removed from the crash site. The fuselage door, outer wing panel and commander's seat were recovered from the crash site and transported to Port Moresby. During the early 1970s displayed at The Air Museum of Papua New Guinea until it closed in the late 1970s. Afterwards, all three items were transferred to the PNG Museum and displayed in the indoor gallery. In the 1990s, the outer wing panel and commander's seat were placed on permanent loan to the Isoroku Yamamoto Memorial Hall & Museum. The fuselage door remained on display at the PNG Museum until the early 2000s (location today unknown). One control yoke was recovered from the crash site. Donated by Lt. Col Tom Guivarra, Australian Army Aviation Corps to the MacArthur Memorial in Brisbane. Today displayed in a glass case with the caption "Betty Bomber Control Column of the Betty bomber carrying Admiral Isoruko Yamamoto when he was shot down by American P-39s Lightnings near Moila Point, Bougainville on April 18, 1943. Kindly donated by Lieutenant Colonel Tom Guivarra, Australian Army Aviation Corps." A control horn was recovered from the crash site, details unknown. Donated to the Australian War Memorial (AWM) and today displayed in the Aircraft Hall. (AWM REL/01198). On July 21, 2015 a "gold tooth" was found at the crash site by Anderson Giles. This visit was funded Chicago entrepreneur and philanthropist Richard Portillo to commemorate U.S. Marine Corps veteran William “Bill” Faulkner who served on Bougainville. Afterwards, Portillo negotiated for the purchase of this artifact and has the item in his personal collection. References Air'Tell Research Report "G4M Serial Numbers" by Jim Long Kodochosho, 705 Kōkūtai, April 18, 1943 13th Fighter Command "Fighter Interception Report" April 18, 1943 70 FTR SQ page 365 (PDF page 569), 339 FTR SQ 608 (PDF page 612) USAF Historical Study No. 85 USAF Credits For The Destruction of Enemy Aircraft, World War II [PDF] Alphabetical: Barber Rex T. page 17 (PDF page 22) / Alphabetical: Lanphier Thomas G Jr. page 111 (PDF page 118) / Chronological List: 04/18/43 page 383-384 (PDF page 388-389) / 339th FS page 608 (PDF page 612) Australian War Memorial (AWM) "G4M1 Betty bomber control horn" REL/01198 photo 1 Australian War Memorial (AWM) "G4M1 Betty bomber control horn" REL/01198 photo 2 Australian War Memoiral (AWM) "Nippon Nyusu No. 155 = Japanese News No. 155" F06851 video time: 1:43–5:33 time code: 01:03:13:15–01:07:02:15 Admiral Jinichi Kusaka (1958) part 5 Fleet Admiral Yamamoto Japanese Information Clearinghouse Bulletin (1983) Issue 1 18 April The Admiral's Last Flight 1943–1983 Yamamoto Autopsy (1971) details the crash site, remains recovery and autopsy Rust In Peace (1975) pages 201-207 After The Battle Issue 8 pages 50-53 includes account of the 1968 visit to the site by a Japanese photographer and 1969 visit by Bruce Adams and Malcolm Lang, administrator at Buin plus photos by Bruce Adams (identical to the photos published in Rust In Peace) The Reluctant Admiral (1979) by Hiroyuki Agawa pages 374-378 Pacific Aircraft Wrecks... And Where To Find Them (1979) by Charles Darby pages 34 (photos) Air Force Board for Correction of Military Records testimony of Dr. Charles Darby, October 17-18, 1991 (AFBMR Docket: 91-02347) "There was no evidence on any remaining wreckage of an attack from the bomber's starboard beam as related in all of Lanphier's accounts." Papua New Guinea Pacific War Images (1984) Attack on Yamamoto (1990) pages 102 (photos) 230-231 Fading Victory The Diary of Admiral Matome Ugaki 1941-1945 (1991) pages 222-223, 330-331, 350-360 plus footnotes Pacific Air Combat WWII (1993) by Henry Sakaida pages 1 "Preface and acknowledgment" 32-35 "A country boy from Niigata Prefecture" Ballale Naval Engineering Group (1994) part 7, section 4 The Fleet Admiral shot down Note on and about Admiral Isoroku Yamamoto and His Manner of Death Re-considered (1994) by Jiro Anzai [PDF] Hostages To Freedom The Fall of Rabaul (1995) page 177, 179, 184 P-38 Lightning Aces of the Pacific and CBI (1997) chapter 2 "The Yamamoto Mission" pages 14-17 Last Flight Of Yamamoto (1999) by Jack Fellows Yamamoto Crash Site Landowner Association (1999, 2002) Osprey Combat Aircraft 22 Mitsubishi Type 1 Rikko 'Betty' Units of WWII (2001) by Osamu Tagaya page 52 (profile 12), 70-71, 107, 112 (index) 13th Fighter Command in World War II (2004) chapter 8 Yamamoto Mission by Jim Lansdale pages 137 -162, 320 (profile) USNI Blog "The Solomons Campaign: Operation Vengeance – The Shootdown Of Yamamoto" (2009) Fortress Rabaul (2010) pages 342-343 Aviation History Magazine "Death by P-38" (2012) by Don Hollway Killing a Peacock: A Case Study of the Targeted Killing of Admiral Isoroku Yamamoto (2015) by Maj Adonis C. Arvanitakis ABC "Japanese ambassador to PNG HE Hiroharu Iwasaki with Deputy Director of National Planning at the Yamamoto crash site" (May 12, 2015) by Sam Bolitho Military History Magazine "Yamamoto Crash Site Reopens to Visitors" November 2015 page 12 Chicago Tribune "Does Chicago hot dog king have WWII Japanese admiral's gold tooth?" by Ted Gregory September 18, 2016 Japan Times "Chicago hot dog czar may have Japanese World War II admirals’s gold tooth" September 21, 2016 World War II Magazine "Appraising An Unexpected discovery" Jan/Feb 2017 Vol. 31 Issue 5, page 12 AP "Researchers mark death of Pearl Harbor mastermind Yamamoto" by Chris Carola April 16, 2018 Thanks to Isoroku Yamamoto Memorial Hall & Museum, Yoji Sakaida and Jim Lansdale for additional information Contribute Information Are you a relative or associated with any person mentioned? Do you have photos or additional information to add? Last Updated April 15, 2023 |
Betty Photo Archive |
| Discussion Forum | Daily Updates | Reviews | Museums | Interviews & Oral Histories |
|